Sunday, July 28, 2013

My Instructable Post

So I posted an Instructable outlining my PCB toner transfer project. If you guys are interested, it's here:

http://www.instructables.com/id/DIY-PCB-Toner-Deposition-Method/


Take a look, let me know what you think. In the near future, aside from posting about random other stuff I'll make, I'll be posting about my struggles and (alleged) triumphs working with EagleCAD (or KiCAD, depending on directions taken for size of board and reselling intent) and LaserCAD, which is the program at the space that we use with the driver for the laser cutter.

Thanks for coming by! 

First Tests - with Lasers!

Okay, so this is a lead up to an instructable that I will be posting shortly; this is the testing I did to lay the groundwork.

I made the assumption that since a laser toner printer was simply selectively melting powder electrostatically deposited on the work piece - the paper - that all I had to do to translate this process to metal to overcome the current transference of toner to work piece! So, to that end I am going to take the powder coating gun from earlier and load it up with toner ink refill (Brother brand, though I'm not sure if this whole process will be very sensitive to the specific mesh of the toner) and I'm going to use the powder coating gun to give the metal an even coat of acid resist that is easy to remove.


The final goal of this is to have a new and less paper dependent method to use for etching homebrew PCBs.
First, I grab just a random scrap of metal lying about and coat it, which turns out great. The touchy part comes when I start trying to get the powder to melt without being turned into a puff of smoke by the laser cutter. This turns out more difficult, but not impossible.


Once I've turned down the laser enough to make a good bit off difference, and less burn off happens, I then start running through etching tests with copper clad board.


At the end of it, it ends up coming down to a rather non intuitive solution; on top of turning the laser's power all the way to minimum, I also have to run the cutter head at slow(est) speeds to avoid 'chop' or stuttering in the traces (which don't contribute to the validity of this method in the slightest). The extra time taken by this 'low and slow' approach isn't very significant vs the benefits gained.
Once all that is settled, it's time to try a real circuit!

Thursday, July 4, 2013

Powder Coat Gun Blues

So I purchased a powder coating gun from Eastwood through Amazon, and once I had hooked it up I had discovered that it wouldn't pass air through the gun. This was excruciatingly frustrating because I had actually bought this tool to avoid some strange quirk - by making it out of scraps - that would make using it a bother. So, after a fruitless call to tech support (who decided that 30 minutes until the end of the day was a great time to ignore incoming calls) I set to work disassembling the gun.


Gun without hose barb or powder bottle


After testing the gun and determining that the blockage was indeed in the gun, I began to disassemble the gun further, which simply involved scraping the adhesive that they used to make the separate pieces of the powder coating gun together and slightly twisting them to break the friction seal so that they could slide free. As I took it apart, I realized that beyond the air gun part (above, the aluminum handle of the powder coating gun) was where the blockage was.


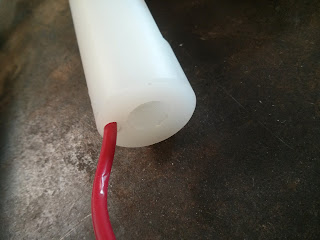
Nope. Nothing down this tube.

So after disassembling the gun further, almost completely (I left the high voltage wire mostly alone) I noticed something strange. This blockage wasn't slow air or inadequate flow, it was total blockage. I wondered how I could possibly have screwed up a brand new gun like this so completely until I noticed something strange about the mating piece that connected the air gun to the electrostatic tube.

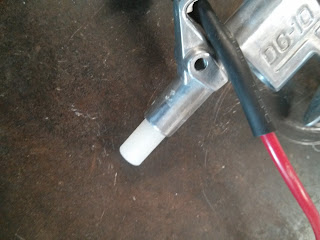
Close up of the mating piece. 
I unscrewed it using a pair of pliers covered in a shop towel (to be sure not to gouge the surface of the mating piece - I still wanted to put this back together!) and examined it further and realized that this was the blockage. Air passed freely through the gun, through the tube, and through everything else. Not this piece, though; not at all. I noticed that there wasn't any way to pass air from one piece to the next; no holes, no gaps for air to leak past into the powder bottle.

Something's not missing from this piece. 

After taking an inordinate amount of time on this already, I pretty much settled on the idea that I was going to have to put a hole into this piece if I was to actually coat anything any time soon. So I dug out some small drill bits I had and used them to put a 1/16" of a hole into the mating piece.


Drill bits are always handy.
After putting everything back together, making sure to use silicone to mate all the pieces back to where they needed to be (be sure to re-install the tubes that go into the powder bottle back correctly), I put it all together and it worked like a charm. Awesome! Back to what I was trying to do before.

Questions? Comments? Leave 'em below! 

Tuesday, June 25, 2013

Small Paint Spray Booth

So we have a lot of fans of spray paint and the like at the space, and I'm one of them. Since we had some extra wood kicking around and I pulled a radial exhaust fan out of that HVAC unit I though I'd put together a small paint booth just for that purpose.

Here's a few pictures of it.
I reused the old mounting bracket from the HVAC unit to mount it to the booth without impeding the fan blades, and also make it easier to remove and service if necessary.

Added a gangbox and switch to the side so that I could leave it plugged in somewhere and not have the motor running constantly.

Shot of the front. It's basically a box with one side missing, not too terribly complicated.
The air filter is set at an angle in the back so that the air flow is pulled down and back. 

Air regulator I picked up from the local Grainger; it also has a moisture trap built into the bottom. 


I added a skylight - a glass pane someone pulled from a scanner bed was laying about and one of my friends said that the booth could use more light. 

Mounted the regulator on the side, for easy use. Sorry for blurry picture. 

If you have any questions or suggestions, feel free to leave a comment!

The Beginning

Hey, thanks for stopping by. I decided to make this blog for all the things I've been up to, so I can have some semblance of record keeping for the stuff I do that's slightly interesting. I've got quite a backlog of things, so the first few posts are going to be pretty much one on top of the next.

Alright, let's get started.

This is an HVAC furnace (sans the AC condenser part) that I converted into an air scrubber to use in the dirty shop.

Here's the unit without the coil or the intake attached. It still has most of its guts inside (control board, heat transfer mechanisms and blower)

Better shot of the squirrel cage

Coil over here, removed pretty eaily - I only needed to separate it using a putty knife since it was held together by silicone. 

Here's where the hot exhaust from the natural gas burners would exchange heat with the air exiting the main squirrel cage below. 

Hooray! Extra parts. I removed all of this to use for later.

Measuring for a filter. 

Finished product!


On the left: Covered recessed male plug; it receives the female end of an extension cord to minimize clutter when moving the unit around.
On the right; basic lightswitch - I bought a heavy duty one, turns out that this unit rarely pulls over 5 amps and almost never over 10, so it's pretty overbuilt in this regard. 

It's faint, but that's a light coating of sawdust. Looks like it's already proving useful.


So a couple notes here; there's a significant portion of heat-resistant refractory wool in here, and you want to avoid breathing that in since it's not exactly healthy. I ended up coating almost all exposed fibrous insulation with tape, and I suggest similar precautions be taken if you plan to do this yourself. Also, make sure you grab some sort of ammeter and determine whether your motor is overloaded, as it could burn itself out by trying to move too much air. Otherwise, great easy build, and the machine works great and it's perfect for exchanging the air in the small dirty shop we have here at the space.


Questions or suggestions? Leave a comment below!